Let's start off with a Console application. (This could even be a Windows Forms application, a Windows service or a Web Application/Web Site.)
Step 1: Add references to Microsoft.Practices.EnterpriseLibrary.Common and Microsoft.Practices.EnterpriseLibrary.Validation
Step 2: Create a class that can store your data
namespace MyApplication1
{
public class UserProfile
{
public int ID { get; set; }
public string Name { get; set; }
public string Email { get; set; }
public DateTime DOB { get; set; }
public string Address { get; set; }
public string CityCode { get; set; }
}
}
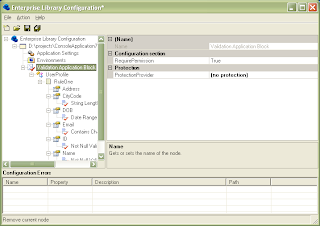
Step 3 (GUI):
Start the Enterprise Library Configuration tool by going to Start > Programs > Microsoft patterns and practices > Enterprise Library 4.1 - October 2008 > Enterprise Library Configuration.
You may have a different version of the Enterprise Library installed - I'm using 4.1, but you can use 3.1 just as well.
Using the Enterprise Library Configuration tool,
(i) add a Validation Application block section,
(ii) Add a type,
(iii) Add the properties (or fields/methods, as the case may be),
(iv) Add validators to the properties (or fields/methods from iii ), and
(v) Provide the parameters for the validators, if applicable

Step 3 (Manual Config):
Add the validation configuration section in the config file (App.config or web.config) by adding the following line into the configSections tag:
<section name="validation" type="Microsoft.Practices.EnterpriseLibrary.Validation.Configuration.ValidationSettings, Microsoft.Practices.EnterpriseLibrary.Validation, Version=4.1.0.0, Culture=neutral, PublicKeyToken=31bf3856ad364e35" />
You would need to change the Version and PublicKeyToken if you're using a different version of the Enterprise Library.
Create the validation section, reference the type to be validated (from Step 2), add a ruleset, define the properties for the type (only the ones you need validated), and create the validators within the type. The hierarchy is validation > type > ruleset > properties > property > validator.
<validation>
<type assemblyName="MyApplication1, Version=1.0.0.0, Culture=neutral, PublicKeyToken=null" name="MyApplication1.UserProfile">
<ruleset name="RuleOne">
<properties>
<property name="Name">
<validator name="Not Null Validator" messageTemplate="Name must be entered" type="Microsoft.Practices.EnterpriseLibrary.Validation.Validators.NotNullValidator, Microsoft.Practices.EnterpriseLibrary.Validation, Version=4.1.0.0, Culture=neutral, PublicKeyToken=31bf3856ad364e35" />
</property>
</properties>
</ruleset>
</type>
</validation>
Step 4: Add the .NET code
Add the following using statement to the top of your code file:
using Microsoft.Practices.EnterpriseLibrary.Validation;
Add the following code to perform the validation:
UserProfile usrProfile = new UserProfile();
Validator<UserProfile> validator = ValidationFactory.CreateValidator<UserProfile>("RuleOne");
ValidationResults results = validator.Validate(usrProfile);
StringBuilder strBuilder = new StringBuilder();
foreach (ValidationResult iterResult in results) {
strBuilder.Append(iterResult.Message + "\n");
}
Console.WriteLine(results.isValid.ToString());
Console.WriteLine(strBuilder.ToString());
Step 5: Run the application
You can add different kinds of validators or even write your own custom validator, but that's something for another blog post.
1 comment:
I'd recommend taking the version and strong name out of the config from EntLib depending on your deployment Scenario. If you doing an xcopy deploy there's no need for it, one less thing to change when you upgrade.
Post a Comment